Uploading videos to display directly into blog posts is the main reason I began blogging. I have used Google, BlipTV and YouTube to host mine. Generally speaking I’d say the processing quality is definitely improving all the time since I first began over three years ago. I’m sure others would agree.
However, I should stress that uploading your video does not improve its quality in any way. It’s best to be realistic if you fancy trying it. If your video is jumpy or grainy before you upload it then you should expect that to be the case with an upload too and most likely it could be worse.
Perhaps you don’t fancy uploading your own videos but like the idea of adding one to a post for a bit of humour perhaps or to illustrate something. For example, how you might be feeling when you see it snowing… again… and again…
YouTube and the others have a wealth to choose from. What you may not have considered is that getting the video ‘into’ your post is very likely to be a whole lot easier than finding the one you are actually looking for!
To get a video into your blog post it’s really just a case of adding the embedded code into the ‘Edit HTML’ part of your post and you’re sorted. As I am familiar with YouTube I’ll demonstrate the process with them using one of my recent videos.
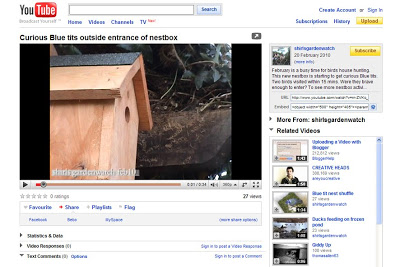
Okay, we’ve found the video we are looking for. We’ve played it and are happy to put it in our post. To display our video we are looking to find the embedded code. We can find that in the video description panel shown in grey below.
 Clicking on all images will enlarge them.
Note we are looking for the embedded code and not the URL. Let’s click on the embedded code to select it…
.jpg)
Once our code is selected we can see now that the list of related videos down the right hand column has disappeared and we are now looking at options specifically for our video. We should make our selections before copying our code as the code does change with each option.
My preference is not to include related videos as I don’t like the advertising. I also choose not to show a border as my blog background is dark. I’ve never looked at the enhanced privacy. So basically I make sure that no boxes are selected in that section.
The next panel of paired coloured boxes refers to the playing panel, titles and borders. We’ll experiment with that later. The default option for colour is set to the first one with white and grey. I leave that as is.
Moving on to the last panel of boxes we are now selecting the size of our video, I believe the default setting is for the second option at 425×344 although I have been tampering with this panel one tonight. That size will most likely suit most post columns so we should be okay with that.
With all our video options selected we are now ready to copy our embedded code and paste it into our post using in the ‘Edit HTML’ option. If we were to post/play our video now this is what it would look like…
Mm… but I have a wider column now and prefer to see my video in the centre of my post if possible. To do that all we need to do is select the ‘Edit HTML’ tab of our post and find our code using the text above it as a guide.
My image below was taken before I wrote this. The selection in blue is highlighting our code. We now have center proceeding our code with a closing tag /center to end it (both enclosed with < > ). I have added this. Now our video will be displayed in the centre of the post text.
.jpg)
I have also edited the width and height of our video with an increase of 20%. So now our video looks like this…
Okay, now let’s play around with the settings again to change how our video could look. Let’s try a purple border and the next size up which should fit our post width.
.jpg)
With our new code copied and pasted into our post again now our video looks like this…
Ah… we forgot to add the center tags! Okay, let’s try one more style. How about we try the smallest one with a warmer colour to match the nestbox. Let’s copy and paste our code once again.
.jpg)
This smaller version of our video probably would look odd in the centre so we’ll leave it as is. Here’s how our video looks now…
Mm… we could have our post text alongside this video. That might make an interesting layout for a change. My first experiment with that has just failed. Looks like that won’t work for us then. What do we think here? Too small to view now?
When the quality of a video is good I have to say it’s a shame not to see it larger. On the flip side of that if you have a video capture that you want to share and the quality is putting you off then by displaying it in a smaller size could be your answer.
Now… have a whetted your appetite? You don’t have software? No problem… here’s another video I discovered earlier…
This wasn’t my planned posting for today but I do hope you’ll find it helpful in some way. I also planned to prepare a ‘Tech Tuesday’ posting with most of Tuesday left!! Ah well… I got distracted browsing old footage and collecting new stuff. I’ll come back to that 🙂
I should perhaps add that I have never tried the blogger uploads. However, I do plan to give it a try for comparisons with others for the next time.
Thanks for your blog on uploading videos. I've just logged on but as yet I haven't had time to absorb it, I'll do that later in the day.
David
Very nice tutorial.
Great tutorial. I shall have to have a go. I have just found you on facebook having been recommended to you by, I think, Zoe. Good to meet you.
Very useful tutorial Shirl, thank you xx
Hi again David, as I mentioned to you already I don’t think this one is exactly what you are looking for at the moment but I’ll work on that when I can.
I worry at times that I make my blogs too long and detailed and put people off reading them. I struggle with short 😉
Hi again Sweet Bay & RO and hello Elizabeth 🙂 I am very flattered you all describe this as a tutorial.
Sweet Bay, thanks for stopping by to say so 😀
Elizabeth, thank-you. I am thrilled to hear that… looking forward to seeing how you get on. I enjoyed chatting to you on fb earlier. I recognised your name from comments on someone’s blog. Not sure who now. Yes, nice to meet you too 😀
RO, you are most welcome! Just thrilled that you also see this as useful. I hoped it would be. It just seems a shame not to share some of the stuff we pick up during blogging. Tricky deciding how to post on it though… had fun with this one 😀
Havng read your post in more detail thanks to you I've manage to upload a post onto my blog from utube and I think it is an improvement on the older video blogs I've done.
Hello David, I am absolutely thrilled to hear this and your footage looks fantastic. I love the clarity of your sound and narrations too 😀
I had a feeling you might get good results with YouTube as I am guessing your original film will be of very good quality 😀
Have a great weekend 😀
Thanks for posting this, Shirl – it will be very helpful – I don't usually post videos but one of the posts I'm planning at the moment will need one, so you've saved me a lot of time working out how to do it!
Just a thought about the idea of putting text alongside the video (or any other picture) – if you ever do that, it's worth having a look at your blog in Firefox (assuming that's not your usual web browser) and making sure that those people not using IE won't be seeing the pictures over the top of the text or vice versa.