
In Part 1 of my posting on Arbours and Pergolas, for Gardening Gone Wild’s January Design Workshop, I wanted to show some of the inspiration I used for structures in my own garden. Now, I should probably say that Part 2 is most likely to only be of interest to gardening readers. However, I would perhaps suggest that others interested in birds and wildlife briefly scroll down the photos to see that my garden isn’t wild yet I still manage to attract many birds and hedgehogs too.
Where to start? Gosh, this has been very hard and it has taken me a week searching through photos, selecting which ones and scanning old pre digital ones. I have selected photos then rejected photos. I also have better quality photos too. I have uploaded photos and deleted photos. Ultimately my thoughts were to show how and why I chose my structures.
I am not a garden designer so I am not about to say this is the way to go. Design is personal taste anyway isn’t it? However as a former graphic designer I cannot leave things alone! You will have perhaps noticed that I am always tweaking things on my blog. In my garden I look at all areas from every angle and having a small garden I want it to flow – but hey that’s just the way I like to do it. So, now I would suggest you get your coffee pot flowing as this is a lengthy post!
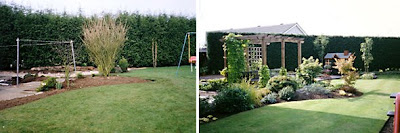
Opening the garden gate into my back garden when we moved here and your eye was completely drawn to the far corner and you saw the whole part of this area in one go. Nothing stopped your eye going straight to the boundaries. There was a strip of lawn and a large area of gravel and paving as you will see in the first photo below. A few years on and we had toddling daughters and a Wooden Wendy house which, located in front of the hedge, stopped the eye going all the way to the corner.

 The wide straight paths now fooled the eye into thinking this area was larger and gave my daughters room to run around! I focused a lot on all the paths that would go this way and that – secretly imagining running around as a child myself! Yes, well, we are all a child at heart aren’t we? On the right you can just see my pergola but I’ll come back to that later.
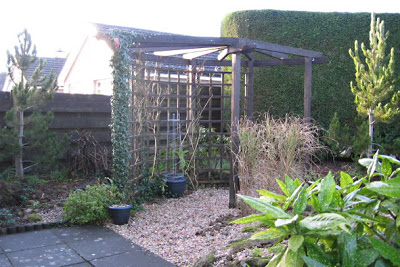
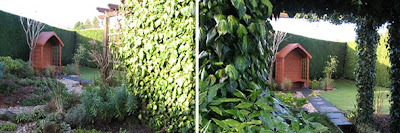
The large photo above shows my garden as it is now in winter – photo taken last week. Notice you can no longer see the corner at all now. The Wendy house has been gone a number of years now and was replaced initially by a garden seat then this year finally with an arbour. You can just see the arbour through the trellis.
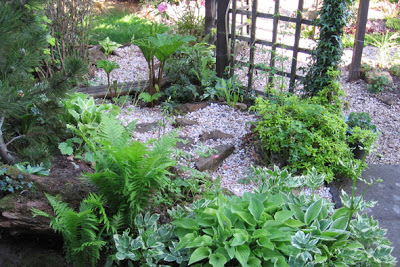
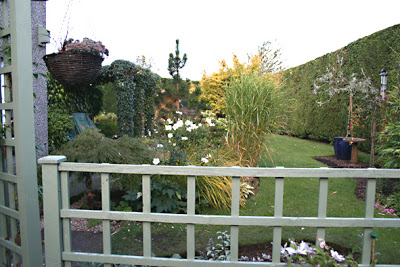
 A secret jungle garden was my daughter’s request for the area behind my fence. I originally had forest bark paths but they proved too messy and slippery in wet days so I replaced them with gravel. I like to see this gravel on both sides of the trellis in winter and spring as it joins the two areas together. This area also slopes slightly upwards towards the hedge and I chose to further exaggerate this by digging a hole in the middle so my daughters would walk down into the jungle and back up and out of it again.
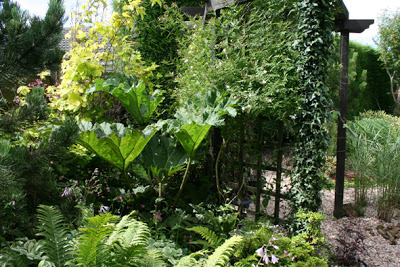
This is where my Gunnera is planted as all water runs towards it. This was the plant that my daughter felt would really make it a jungle – that and bamboo! So how did we make it secret? We added trellis to that side of our pergola walkway to enclose it and then I planted ivy and jasmine up this trellis. I later added golden hop to grow up and through the bamboo too. Of course being in dappled shade this area was also perfect for ferns too.
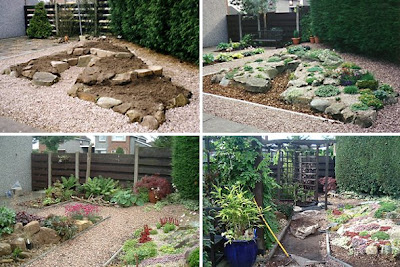
 Turning and changing direction as you walk through this pergola is what I really love about it – oh yes and the beautiful scent of jasmine in the summer. My plan was to connect the secret jungle with my original rock garden to my rock scree. It connected three small areas making the whole area feel much larger – we called this structure ‘The Walkway’.
As this wasn’t on completely flat ground we had the bonus of being able create a very gentle slope allowing you to walk up/down through it. I am delighted with it. I now have tall grasses next to one of the poles so you feel that you are walking through the structure without have plants growing up this pole. I really think tall plants and shrubs around a structure help tremendously in creating a sense of place for them.
 Above and below, I hope the before and after photos show just how much a vertical structure can give privacy, interest and a feeling of space to a small garden. I now could never conceive of having a garden without a few structures. I would even add obelisks into this category as I have certainly enjoyed mine through the winter too after putting apples on them for visiting birds.
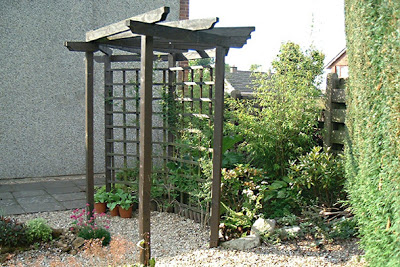
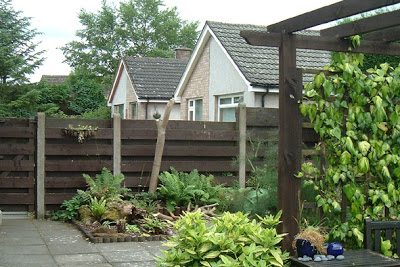
 Before adding our first pergola my garden really looked quite bare especially as I sat on the garden seat behind the fence looking out on to it as you can see in the photo below. Although I do have memories of enjoying sitting watching my daughters run around the paths and in and out of the Wendy House – something at that time was still missing.
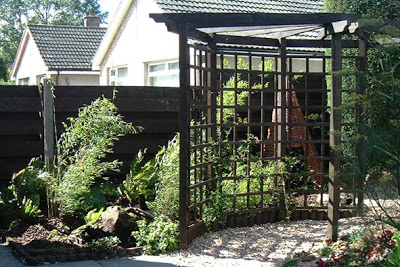
It was so obvious that I never thought of it. I needed height! I needed something to walk through and my daughters to run through. I needed tunnels. I needed a pergola – and that first pergola shown below was to change my whole garden and indeed the way I gardened.


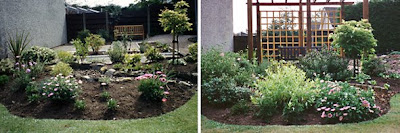
 Informal edges and curves to my borders replaced the straight formal ones as I added more vertical height to my garden – one seemed to come with the other. My daughters were no longer small so my paths became winding and informal. I could now look along the length of my garden without seeing its end – which ever way I looked! I began choosing plants to deliberately spill their foliage over the now curved edges of my borders. Yes, I was now even playing with perspective.
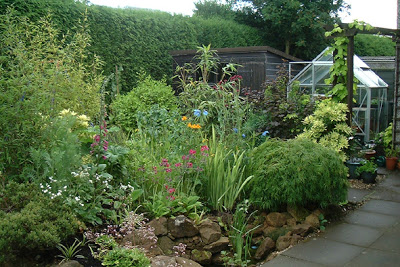
Looking out from in front of my greenhouse, in the first photo below, is a view that I have really enjoyed over the different planting years I have had in this garden. I have a surprise here for 2008 too – no sorry can’t say yet! However, once again by adding height with an arch and a very small 3ft high by 6ft long trellis beside it I have changed the whole feel of this area. All utiilty items of the garden are now set back out of the garden and from here I feel walk into my garden. I also changed the colour of these structures last year too which has added another green to my garden and at the same lifted this area in dull dark days.
 Finally, sorry if your coffee cold, I come to the newest and most special structure of my garden – the arbour. We bought this as a kit, unlike our other structures which were planned mostly by me and wonderfully executed by my husband – with a bit of negotiation of course! We spotted this arbour in a local garden centre, ordered it and waited for it to arrive. It was April 2007 and it was a beautifully warm and sunny month. Gosh, it was taller and much heavier than we expected when it arrived– so we changed its location! You know how it is when you plan it in your head, it looks right in the shop, but … when you get it home Mmm!
It now sat in the spot that our daughter’s Wendy House sat – that was probably the right place for it all along. One of my daughter’s enjoyed lounging on it reading a book some days last summer – but unfortunately it was our wettest summer for a few years. We didn’t sit often under our arbour and nor were we able to sit under our pergola to eat our evening meal together too often either. However, you can guess what I am going to say now, I am really looking forward to this summer and sitting out in my garden!
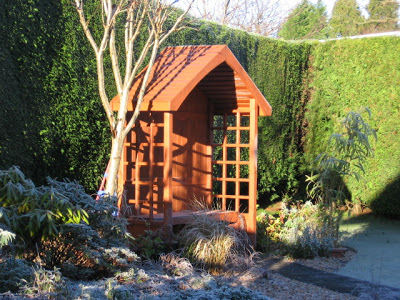
 Just one more very important point… I would like to add how grateful I am that my husband made such strong structures as last week we had some very strong winds overnight and during the day! Our house lost some tiles. I was a little worried about our Arbour as it is completely free standing and I was very apprehensive as I opened the blinds that morning. Thankfully it was okay as were all our structures where we used metal spikes straight into the ground for our upright posts. I really didn’t want clumps of cement under my plants and so far this method has served us well – let’s hope it continues!
All photos above were taken in my garden sometime during the last 16 years.
Your garden is beautiful. I’m a graphic designer too and enjoy your problem-solving – both mechanically and visually through your garden. No whims. Everything has a purpose. Everything unique to you. I like that.
Hi there, Jim 🙂
Thank-you for such a very generous comment!
I have to say that as these are the most views I have ever posted on my garden I was a tad nervous about posting. Your comment has really made my think. Yes, I suppose everything has had a purpose and even some plants do too. I see from your blog that you have many interesting photos – I will return for a longer browse soon 😀
Wow, Shirl! All my compliments!! You explained so well what you have done. Everything fits perfect and has got a sense.Your garden really looks beautiful! I like very much the trellies…I think I’m going to make it too. As my husband has two left hands ;-), I probably have to do it myself. Did you take a special wood sort for it?
This was (again as usual) a great post!
Hi again, Barbara 🙂
Thank-you so much! I was wondering what the gardeners that regularly visit my blog would think. Sometimes when you have a picture in your head of something and then you finally see it properly it can be a disappointment. I’m delighted that you liked my garden 😀
The wood we used was sawn softwood that was pressure treated and then we stained it with preservative after the structure was built. We bought some support beams with the shaped ends and then my husband used these as templates for others so we didn’t waste any pieces of wood. I had intended giving more details on how we built some parts of our structures and had cropped photos ready but as this post got so long I left them out. If you would like to see these photos just email me and I’ll be happy to send them to you 😀
I had no idea that your neighbors were that close. The addition of structures & the hedge has made your garden a private little world. Absolutely fabulous!
YES PLEASE, Shirl, and thank you very much!!!
This was a great explanation of how carefully planned structures in your garden enhanced the way you live in it – thanks, Shirl! I’m jealous of your mature hedges – we’ve planted many shrubs over the last 3 years but they’re too small to provide privacy as yet.
Annie at the Transplantable Rose
Hi again, Mr McGregor’s Daughter and Annie 🙂
Mr McGregor’s Daughter – Yes, we have neighbours quite close on three sides and that was a consideration when I chose the locations and types of structures that we have. From inside my garden I tried to make sure that my structures and vertical plants, as much as possible, stopped my eye from going straight to the windows of my neighbour’s houses. The hedges are great for privacy 😀
Annie – Thank-you, I took ages in decided how to do this and what photos I should use. We were fortunate to have our main hedge already mature and the long strip along my garden’s length had been planted when we moved in. We probably would never have chosen Leylandii for our hedge but it has proved a great background for my plants, a home and perhaps nesting sites for garden birds and a great windbreak too. Unfortunately the downside of this hedge is that together with our house it shades much of my garden – but then again that just makes planting more of a challenge 😀
Your garden is absolutely gorgeous. Love this post. What is that hedge? It looks a bit like a Canadian hemlock hedge I had in New York. Is it a bear to prune?
Hi there, Karen 🙂
Thank-you! This post was indeed a labour of love 😀
My hedge is Leylandii and it is definitely a beast to keep in check. However with the strong winds that we have had recently it has been an excellent wind break. As you can see it also gives us great privacy so the pruning is well worth all the effort 😀