Yesterday we finally found the time to take down our Camera Nestbox and give it all a good clean in preparation for any birds that may want to roost in it over the cold autumn and winter nights ahead. It is important that any Nestbox is cleaned after it has been used as it can harbour fleas and other parasites. Autumn is a good time to do this.
You may find unhatched eggs in a nest and it is actually illegal to remove these from the end of January to the beginning of August. As we had a camera in our Nestbox we knew what to expect when we opened it. We had eight eggs hatch in May but sadly no chicks survived despite the efforts of the parents to find food. Our Nestbox was by no means the only unsuccessful pair of Blue Tits this year as I found out through forums, comments and email. We were very privileged indeed to see any activity at all in our Camera Nestbox especially when it was only up two days when we had our first visitors.
If you were considering putting up a Nestbox with or without a camera I think the 2 minute video clip below would perhaps tempt you. It has not been edited in any way except to add the text. If you turn up your speakers you will hear the female inside the box calling to the male. The light flickering is the male at the entrance hole. When he finally comes in he inspects the box more thoroughly – the female looked exhausted! He also checks out the camera too which was a bit worrying to watch at the time! You can see the whole story from our Camera Nestbox here .
To clean our Nestbox we carefully followed the instructions from the supplier of our Nestbox and only used boiling water to clean it after we scrapped out the remnants of the nest. The nest can be seen in the photos below. It took the female Blue Tit quite a time to build and we were beginning to think at one point that she was going to give up completely!
 The main photo above shows the nest as we found it when we opened the front panels yesterday. You can see how the female Blue Tit layered it all. So many pieces of material came in the box and was taken out again. Maybe this was due to inexperience – perhaps this was her first nest!
The top photo on the right shows the last photo taken from the camera inside the box on Sept 30th. Our camera shows colour when there is good light and black and white on duller days.
The bottom photo on the right shows a photo from the camera in our box at 5pm yesterday after cleaning with it mounted back on the wall. The instruction sheet for cleaning also mentioned that the RSPB recommend adding a handful of clean hay or wood shavings for any roosting birds. We added wood shavings – but it was stressed that the wood shavings should not be treated with any preservative or insecticide.
I have to say this is the second year we have opened a Nestbox to see a nest but despite that still found it fascinating to see in particular when we watched the work that went into building it. Last year it was our Terrace Nestbox that we opened to find a nest for the first time. We opened that one yesterday too but we are still waiting for it to dry out before we put it up again – its design is quite different. I will post on the terrace at the weekend.
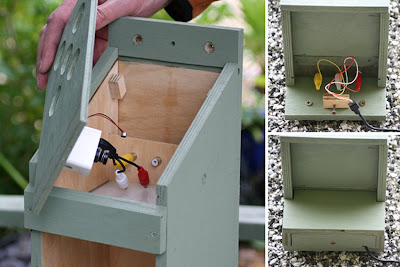
Having our Camera Nestbox open meant that we took the opportunity to give the camera lens and the inside roof a wipe clean too. You can see how the camera fits in our box in the photo above.
You can see where the connectors are in the photos above too. However, we added a ‘box cover’ for the connectors outside the box as we felt they would need protected from our Scottish weather! We have a wire running down our house wall (tucked behind a drainpipe) then it goes through our house wall and we have it connected to our PC. This Nestbox can also show images on a TV and you could just put the cable through a window to see all the action inside.
Infra red would allow us to see inside our box when it is dark although at present we do not have this. We have considered whether we would change this or not for next year – we are undecided on this. At the moment we see inside our box only by daylight through the holes in the roof. A clear piece of Perspex covers the holes. We have been very happy with the way our box has worked. If you were considering buying the same Camera Nestbox I should point out that the manufacturer of our box has changed the design for 2008.
Finally, I wanted to show our Camera Nestbox from the outside. The video above is one of my favourite clips taken from my video camera which I set up on a tripod in my garden.
I have absolutely no idea if our Camera Nestbox will get birds roosting in it in the months ahead as this is all completely new to us. However, we have made our Camera Nestbox ready for roosters and we will enjoy looking in on it to see if it gets used again. I also really hope that in sharing our Nestbox story that possibly more nestboxes might get put up in gardens, schools and places of work – that I would be thrilled about!